Symbol Alignment
- Module:
sync_long.v - Input:
I (16), Q (16), phase_offset (32), short_gi (1) - Output:
long_preamble_detected (1), fft_re (16), fft_im (16)
After detecting the packet, the next step is to determine precisely where each OFDM symbol starts. In 802.11, each OFDM symbol is 4 \(\mu s\) long. At 20 MSPS sampling rate, this means each OFDM symbol contains 80 samples. The task is to group the incoming streaming of samples into 80-sample OFDM symbols. This can be achieved using the long preamble following the short preamble.
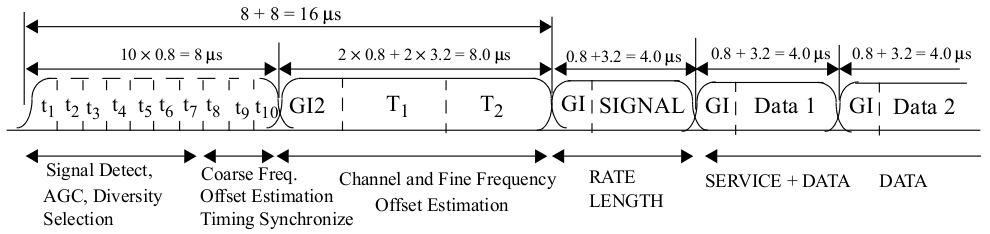
Fig. 9 802.11 OFDM Packet Structure (Fig 18-4 in 802.11-2012 Std)
As shown in Fig. 9, the long preamble duration is 8 \(\mu s\) (160 samples), and contains two identical long training sequence (LTS), 64 samples each. The LTS is known and we can use cross correlation to find it.
The cross validation score at sample \(i\) can be calculated as follows.
where \(H\) is the 64 sample known LTS in time domain, and can be found in
Table L-6 in 802.11-2012 std (index 96 to
159). A numpy readable file of the LTS (64 samples) can be found here, and can be read like this:
>>> import numpy as np
>>> lts = np.loadtxt('lts.txt').view(complex)

Fig. 10 Long Preamble and Cross Correlation Result
To plot Fig. 10, load the data file (see Sample File), then:
# in scripts/decode.py
import decode
import numpy as np
from matplotlib import pyplot as plt

fig, ax = plt.subplots(nrows=2, ncols=1, sharex=True)
ax[0].plot([c.real for c in samples][:500])
# lts is from the above code snippet
ax[1].plot([abs(c) for c in np.correlate(samples, lts, mode='valid')][:500], '-ro')
plt.show()
Fig. 10 shows the long preamble samples and also the result of cross correlation. We can clearly see two spikes corresponding the two LTS in long preamble. And the spike width is only 1 sample which shows exactly the beginning of each sequence. Suppose the sample index if the first spike is \(N\), then the 160 sample long preamble starts at sample \(N-32\).
This all seems nice and dandy, but as it comes to Verilog implementation, we have to make a compromise.
From (1) we can see for each sample, we need to perform 64 complex number multiplications, which would consume a lot FPGA resources. Therefore, we need to reduce the size of cross validation. The idea is to only use a portion instead of all the LTS samples.
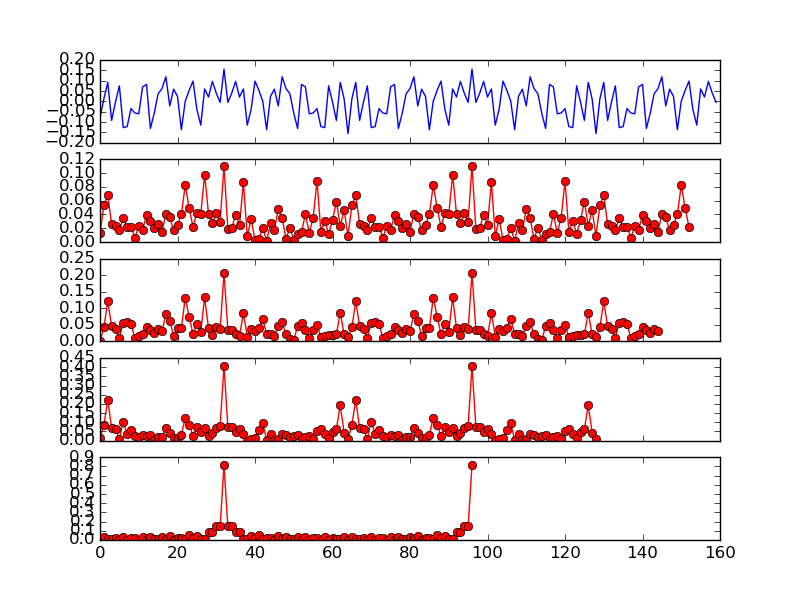
Fig. 11 Cross Correlation with Various Size (8, 16, 32, 64)
Fig. 11 can be plotted as:
lp = decode.LONG_PREAMBLE

fig, ax = plt.subplots(nrows=5, ncols=1, sharex=True)
ax[0].plot([c.real for c in lp])
ax[1].plot([abs(c) for c in np.correlate(lp, lts[:8], mode='valid')], '-ro')
ax[2].plot([abs(c) for c in np.correlate(lp, lts[:16], mode='valid')], '-ro')
ax[3].plot([abs(c) for c in np.correlate(lp, lts[:32], mode='valid')], '-ro');
ax[4].plot([abs(c) for c in np.correlate(lp, lts, mode='valid')], '-ro')
plt.show()
Fig. 11 shows the long preamble (160 samples) as well as cross validation with different size. It can be seen that using the first 16 samples of LTS is good enough to exhibit two narrow spikes. Therefore, OpenOFDM use cross correlation of first 16 samples of LTS for symbol alignment. To confirm, Fig. 12 shows the cross correlation of the first 16 samples of LTS on the actual packet. The two spikes are not as obvious as the ones in Fig. 10, but are still clearly visible.
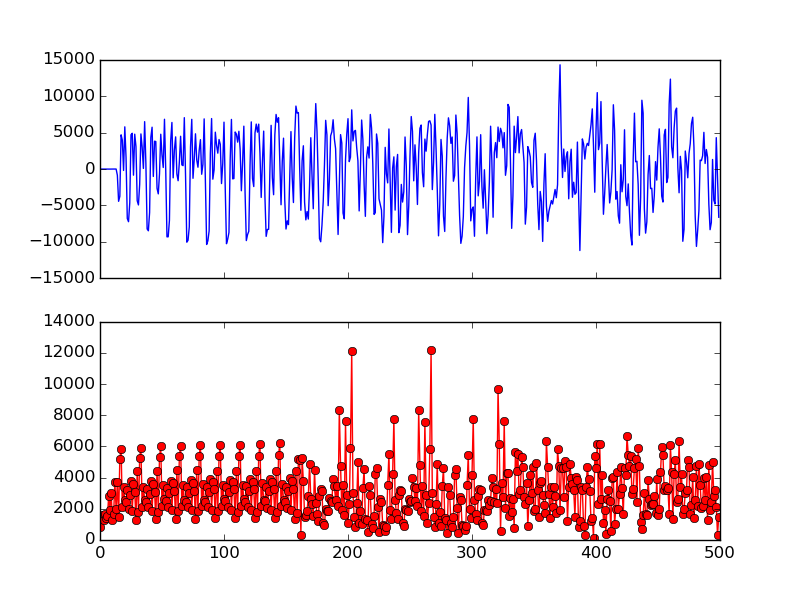
Fig. 12 Cross Validation using the First 16 Samples of LTS
To find the two spikes, we keep a record of the max correlation sample for the first 64 samples (since the first spike is supposed to be at the 32th sample). Similarly, we also keep a record of the max correlation sample for the second 64 samples. For further eliminate false positives, we also check if the two spike sample indexes are \(64 \pm 1\) apart.
FFT
Now we have located the start of each OFDM symbol, the next task is to perform FFT on the last 64 data samples inside each symbol. For this we utilize the XFFT core generated by Xilinx ISE. Depend on if short guard interval (SGI) is used, the first 16 or 8 samples of each OFDM symbol need to be skipped.
But before performing FFT, we need to first apply the frequency offset
correction (see Frequency Offset Correction). This is achieved via the rotate module
(see Rotation).